When I got the GS728TP I was fairly surprised that Netgear claimed the only way to configure it was through their web management interface. While the web interface is fine for basic configuration, it is slow and freezes if you don’t let the page load completely before clicking. I was not satisfied with this being the only configuration option and luckily found an alternative.
- Enable Telnet
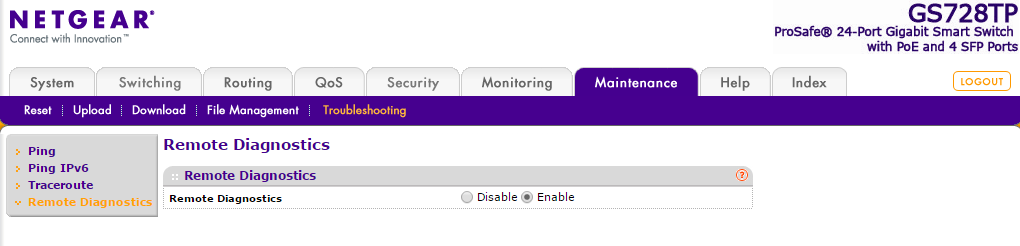
In the manual, Netgear mentions that you can enable telnet “for diagnostic purposes.” To do this, go to Maintenance > Troubleshooting > Remote Diagnostics. - Login
Once you have telnet enabled, connect to it using your favorite telnet client. (Putty works great on Windows). The password is whatever you use to login to the web interface.
Username: admin
Password: <web interface password> (default: password) - Enter Configuration Mode
Once you are logged in, you will be at a command prompt with the name of your switch followed by#symbol.
Typeconfigto enter configuration mode. - Enable SSH
Typeip ssh serverto enable ssh access. When you press enter, it will save the configuration immediately, and you will see something like
27-Jan-2016 16:16:41 %COPY-N-LOGGINGFILECOPYSTOP: stop log messages related to file copy operations

27-Jan-2016 16:16:43 %COPY-N-LOGGINGFILECOPY: start log messages related to file copy operations
Wait for this to finish before issuing another command. - Enable Password Auth
Next, enable password authentication by typingip ssh password-auth. Again, you will see messages while it saves the configuration. - Change SSH Port (optional)
You can optionally change the SSH port by typingip ssh port <port number>. - Change SSH Timeout
You can view and change the SSH timeout (as well as other options) from the command line. Enterconfigmode and then typeline ssh. The prompt will now show(config-line)#. Typedo show line sshto view the current configuration, and you’ll see that by default the SSH timeout is 10 minutes. You can increase it to 60 minutes withexec-timeout 60.
If you want to setup public key authentication, you can try following this guide I found. I have not verified that this works on the GS728TP, but I suspect that it would.
I have this same model switch. It does not have the “Remote Diagnostics” option on the troubleshooting page. Is it possible that they removed it from the latest software version?
Brian,
That’s interesting. So you don’t see the Remote Diagnostics in the left sidebar? (See here)
What firmware version are you running? I am running the current version (6.0.1.18), and I know the option is there on mine because a few months ago I had to replace the switch under warranty. To reconfigure the replacement, I just re-enabled telnet (then SSH), and programming it over SSH.
My switch also doesn’t have this option – but it turns out that the Telnet server was already running on port 60000.
this was very useful
Tricky! Saved me scanning for the open port. Thanks Peter!
Thanks Liam!
Thanks, this was very helpful!
Hi, Thanks for the tip! I got SSH running using your tips. I’d like to send commands to the switch using a script and I’ve tried the instructions you linked to get a public key installed onto the switch. Unfortunately it fails to execute this line:
copy tftp://131.211.80.9/netgear/netgear-ics-04-dsa.key nvram:sshkey-dsa
(Obviously with my own TFTP server IP and switch name)
It fails with:
Source And Destination URL combination is not supported
Any idea how to get the generated key over to the switch?
Better to use `snmp`. I’ve managed to work out the snmp MIB and oids that let me `snmpget`, for example, to interrogate the PoE enabled/disabled status of ports on the GS728TP,
$ snmpget -v 1 -c POWER-ETHERNET-MIB::pethPsePortAdminEnable.1.
and using the `snmpset` command I can disable a specific PoE port (i.e. turn PoE power off from a specific port).
$ snmpset -v 1 -c POWER-ETHERNET-MIB::pethPsePortAdminEnable.1. = 2
It looks like WordPress lops of text bracketed by certain characters. The above `snmp` commands are missing critical bits. Here they are again, this time I trust not truncated.
$ snmpget -v 1 -c [community-string] [device-IP-address] POWER-ETHERNET-MIB::pethPsePortAdminEnable.1.[port# as an integer]
$ snmpset -v 1 -c [community-string] [device-IP-address] POWER-ETHERNET-MIB::pethPsePortAdminEnable.1.[port# as an integer] = 2
Pingback: Configure SNMPv3 on Netgear GS728TP - Sysadmin RamblingsSysadmin Ramblings
An impressive share! I’ve just forwarded this onto a colleague
who was doing a little homework on this. And he actually
bought me dinner due to the fact that I stumbled
upon it for him… lol. So let me reword this…. Thank YOU
for the meal!! But yeah, thanx for spending time to discuss this
issue here on your internet site.
I have been working on a Cisco 2600 with an internal CSU/DSU. I am a little lost. This blog has helped a little bit. However, would you have some time to contact me with some help? dan@iremedy.net
Rock star – this is brilliant and thank you!! It allowed me to configure sflow which isnt on the menu options…..
Just two questions:
Are the SSH settings persistent after reboot
Do you think the sflow settings will be persistent after reboot
Carlos, the SSH settings are persistent. I do not know about sflow, but I suspect any changes would be persistent. Let me know what you find out.
Many thanks all, especially Peter for the headsup about the open port on 60000…. been beating my head against the wall for a few hours trying to get in with a CLI….
Thank you for sharing that info. I know the Cisco SG200 series switches have telnet running on port 6500 and I suspected Netgear might be doing something similar. Now I can put these switches to use in our network.
We have hundreds of these exact Netgear model switches, the GS 728TP, and the GS752TP, the way you enable or disable telnet is via the web GUI, and enable “maintenance mode” (This is off the top of my head right now since I’m on my iPad, so I may have the name, wrong, but it’s definitely in the web GUI.).
I love these switches! So I was SUPER disappointed when I saw the newer hardware version 2 (easy to spot as they have a USB port on the front), have TONS of features stripped out from both the web GUI and the CLI. (One example being the ability to enable/use sflow.). Additionally, on the newer hardware version the CLI has tons of command, stripped out (the CLI is crippled, which makes them a dead issue for us in terms of usage).
Also, another example- on all of our switches we use the ACLs to drop layer3 multicast packets, on the V2 version I don’t see a way to do this through the CLI. So we still stick to the older hardware version usually bought via eBay since they’re no longer available.
Literally, the only downside/negative to these switches is that they only support 256 VLANs.
We even have tons of spare parts specifically to repair these switches, if they fail.
Outside of that VLAN issue I’ve yet to come across a more powerful switch at a similar price point (with all features being able to be configured through the CLI, which we require due to the number of switches we have deployed + for quick deployment of new switches.